针对现实中捕捉到的图像,我们可能感兴趣的只是其中某些区域,因此,就希望能够把感兴趣区域分割出来。一方面,方便对目标区域整体进行处理;另一方面也大大减少了计算量。对于目标分类时,这种处理方法尤其有效。一般有两种实现方法:GrabCut和风水岭。
一. GrabCut方法
1. 算法实现步骤:
(1)利用矩形选取或定义图像中含有一个多个物体,矩形外的区域将被自动认为为背景。
(2)对于用户定义的矩形区域,可用背景中的数据来区分其前景和背景区域。
(3)高斯混合模式(GMM)对背景和前景建模,未定义的像素点标记为可能的前景或背景。
(4)图像中每一个像素都被看作通过虚拟边与周围像素相连接,而每条边都有一个属于前景或背景的概率(基于与周围像素颜色上的相似性)。
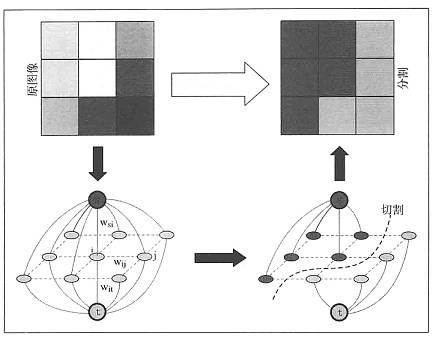
(5)每个像素(即:算法中的节点)会与一个前景或背景节点连接,如图1所示。
(6)在节点完成连接后,若节点之间边属于不同终端(即:一各节点为前景,另一个节点为背景),则会切断他们之间的边,这样便能将图像各部分分割出来,如图2所示。
图1:

图2:
2. 代码实现:
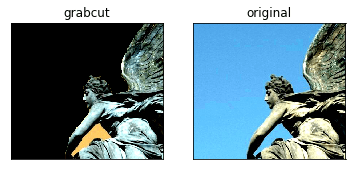
import numpy as np
import cv2
from matplotlib import pyplot as plt

img = cv2.imread('statue_small.jpg')
mask = np.zeros(img.shape[:2],np.uint8)

bgdModel = np.zeros((1,65),np.float64)
fgdModel = np.zeros((1,65),np.float64)

'''
cv2.grabCut(img, mask, rect, bgdModel, fgdModel, iterCount[, mode]) → mask, bgdModel, fgdModel
Parameters:
    img – Input 8-bit 3-channel image.
    mask – Input/output 8-bit single-channel mask. The mask is initialized by the function when mode is set to GC_INIT_WITH_RECT. Its elements may have one of following values:
        GC_BGD defines an obvious background pixels.
        GC_FGD defines an obvious foreground (object) pixel.
        GC_PR_BGD defines a possible background pixel.
        GC_PR_FGD defines a possible foreground pixel.
    rect – ROI containing a segmented object. The pixels outside of the ROI are marked as “obvious background”. The parameter is only used when mode==GC_INIT_WITH_RECT .
    bgdModel – Temporary array for the background model. Do not modify it while you are processing the same image.
    fgdModel – Temporary arrays for the foreground model. Do not modify it while you are processing the same image.
    iterCount – Number of iterations the algorithm should make before returning the result. Note that the result can be refined with further calls with mode==GC_INIT_WITH_MASK or mode==GC_EVAL .
    mode – Operation mode that could be one of the following:
        GC_INIT_WITH_RECT The function initializes the state and the mask using the provided rectangle. After that it runs iterCount iterations of the algorithm.
        GC_INIT_WITH_MASK The function initializes the state using the provided mask. Note that GC_INIT_WITH_RECT and GC_INIT_WITH_MASK can be combined. Then, all the pixels outside of the ROI are automatically initialized with GC_BGD .
        GC_EVAL The value means that the algorithm should just resume.
'''

rect = (100,1,421,378)
cv2.grabCut(img,mask,rect,bgdModel,fgdModel,5,cv2.GC_INIT_WITH_RECT)

mask2 = np.where((mask==2)|(mask==0),0,1).astype('uint8')
img = img*mask2[:,:,np.newaxis]

plt.subplot(121), plt.imshow(img)
plt.title("grabcut"), plt.xticks([]), plt.yticks([])
plt.subplot(122), plt.imshow(cv2.cvtColor(cv2.imread('statue_small.jpg'), cv2.COLOR_BGR2RGB))
plt.title("original"), plt.xticks([]), plt.yticks([])
plt.show()
3. 运行效果图:
二. 分水岭算法
该算法可将图像中的高密度区域(变化很多)转化为“山脉”,将低密度区域(变化很少)转化为“山谷”,这样有助于分割目标。开始从用户指定点持续灌入“水”直到这些区域开始汇聚,为了阻止不同山谷的水汇聚,可以设置一些栅栏。通过这种方式,最终将图像分割成相应的标记区域。
1. 代码实现:
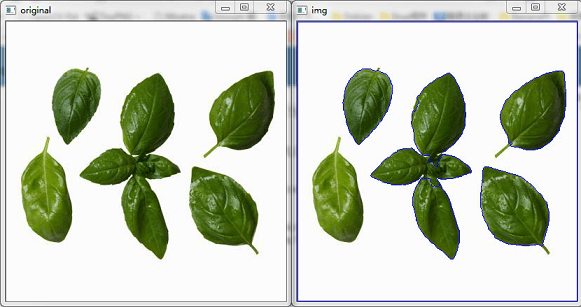
import numpy as np
import cv2

img1 = cv2.imread('basil.jpg')
img = np.copy(img1)

gray = cv2.cvtColor(img,cv2.COLOR_BGR2GRAY)
ret, thresh = cv2.threshold(gray,0,255,cv2.THRESH_BINARY_INV+cv2.THRESH_OTSU)

kernel = np.ones((3,3),np.uint8)

#官网:https://docs.opencv.org/3.0-beta/doc/py_tutorials/py_video/py_bg_subtraction/py_bg_subtraction.html?highlight=morphologyex
#参考:http://opencv-python-tutroals.readthedocs.io/en/latest/py_tutorials/py_imgproc/py_morphological_ops/py_morphological_ops.html

#去除噪声数据,cv2.morphologyEx()一种对图像进行膨胀后再腐蚀的算法
opening = cv2.morphologyEx(thresh,cv2.MORPH_OPEN,kernel, iterations = 2)

#获取大部分的背景图像
sure_bg = cv2.dilate(opening,kernel,iterations=3)

#通过cv2.distanceTransform()获取前景区域
dist_transform = cv2.distanceTransform(opening,cv2.DIST_L2,5)
ret, sure_fg = cv2.threshold(dist_transform,0.7*dist_transform.max(),255,0)

# Finding unknown region
sure_fg = np.uint8(sure_fg)

'''
cv2.subtract(src1, src2[, dst[, mask[, dtype]]]) → dst

Parameters:
    src1 – first input array or a scalar.
    src2 – second input array or a scalar.
    dst – output array of the same size and the same number of channels as the input array.mask – optional operation mask;
           this is an 8-bit single channel array that specifies elements of the output array to be changed.
    dtype – optional depth of the output array (see the details below).

'''
unknown = cv2.subtract(sure_bg,sure_fg)

'''
通过函数cv2.connectedComponents()设置“栅栏”来阻止水汇聚
用0标记图像的背景,然后其他对象用从1开始的整数标记;且输出的结果中使用 unknown 定义未知区域
'''
ret, markers = cv2.connectedComponents(sure_fg)

#在背景区域加1,将不确定的区域设置为0
markers = markers+1
markers[unknown==255] = 0

'''
cv2.watershed(image, markers) → markers

Parameters:
    image – Input 8-bit 3-channel image.
    markers – Input/output 32-bit single-channel image (map) of markers. It should have the same size as image .
'''

#官网:https://docs.opencv.org/3.0-beta/doc/py_tutorials/py_imgproc/py_watershed/py_watershed.html?highlight=morphologyex

#边界区域被标记为-1,因此设置边界为红色
markers = cv2.watershed(img,markers)
img[markers == -1] = [0,0,255]

#显示图像
cv2.imshow('original', img1)
cv2.imshow('img', img)
cv2.waitKey(0)
cv2.destroyAllWindows()
2. 运行效果图:
评论 (0)
暂无评论,快来抢沙发吧!