OpenCV可以检测图像的主要特征,然后提取这些特征,使其成为图像描述符,类似于人的眼睛与大脑。这些特征可作为图像搜索的数据库。
1. 特征定义
特征就是有意义的图像区域,该区域具有独特性或易于识别性。因此,角点及高密度区域是很好的特征,而大量重复的模式或低密度区域则非好的特征。
大多数特征检测算法都会涉及图像的角点、边和斑点的识别,也涉及一些脊向的概念。
2. 特征检测和提取算法
OpenCV中常用的特征检测和提取算法有如下六种:
(1)Harris:用于检测角点;
(2)SIFT:用于检测斑点;
(3)SURF:用于检测斑点;
(4)FAST:用于检测角点;
(5)BRIEF:用于检测斑点;
(6)ORB:表示带方向的FAST算法与具有旋转不变性的BRIEF算法;
本文将依次介绍以上算法的应用。
3. Harris
cornerHarris是一个非常简单方便实用的OpenCV函数,可用来检测图像的角点。
(1)应用举例
# -*- coding: utf-8 -*-
"""
Created on Sun Jun 24 10:05:04 2018

@author: lu
"""

import cv2
import numpy as np

img = cv2.imread('./chess_board.png')
gray = cv2.cvtColor(img, cv2.COLOR_BGR2GRAY)
gray = np.float32(gray)

'''
https://docs.opencv.org/3.0-beta/modules/imgproc/doc/feature_detection.html?highlight=cornerharris#cv2.cornerHarris

Python: cv2.cornerHarris(src, blockSize, ksize, k[, dst[, borderType]]) → dst

Parameters:
    src – Input single-channel 8-bit or floating-point image.
    blockSize – Neighborhood size (see the details on cornerEigenValsAndVecs() ).
    ksize – Aperture parameter for the Sobel() operator. 3~31
    k – Harris detector free parameter. See the formula below.
    borderType – Pixel extrapolation method. See borderInterpolate() .

    dst – Image to store the Harris detector responses. It has the type CV_32FC1 and the same size as src .
'''
#blockSize:参数值越小,标记角点的记号越小
#注意ksize参数:定义了角点检测的敏感度
dst = cv2.cornerHarris(gray,5,23,0.04)

img[dst>0.01*dst.max()]=[0,0,255]

cv2.imshow('corner',img)
cv2.waitKey()
cv2.destroyAllWindows()
****(2)运行结果****

4. SIFT
尽管cornerHarris函数可以很好检测角点,然而如果减小(增大)图像的大小,则可能会丢失(增加)某些部分;也就是说,其检测效果很角点本身的特性有关。因此,需要一种与图像比例无关的角点检测方法,即:尺度不变特征变换(Scale-Invariant Feature Transform , SIFT)。
注:SIFT算法并不检测关键点,关键点由DoG(Difference of Gaussians)检测(DoG是对同一图像使用不同高斯滤波器所得到的结果),****SIFT算法是通过一个特征向量来描述关键点周围区域的情况。
应用举例:
#创建SIFT对象
sift = cv2.xfeatures2d.SIFT_create()

'''
cv2.SIFT.detectAndCompute(image, mask[, descriptors[, useProvidedKeypoints]]) → keypoints, descriptors

Parameters:
    img – Input 8-bit grayscale image
    mask – Optional input mask that marks the regions where we should detect features.
    keypoints – The input/output vector of keypoints
    descriptors – The output matrix of descriptors. Pass cv::noArray() if you do not need them.
    useProvidedKeypoints – Boolean flag. If it is true, the keypoint detector is not run. Instead,
    the provided vector of keypoints is used and the algorithm just computes their descriptors.
'''

keypoints, descriptor = sift.detectAndCompute(gray,None)

'''
Python: cv2.drawKeypoints(image, keypoints[, outImage[, color[, flags]]]) → outImage¶
Parameters:
image – Source image.
outImage – Output image. Its content depends on the flags value defining what is drawn in the output image.
           See possible flags bit values below.
keypoints – Keypoints from the source image.
flags – Flags setting drawing features. Possible flags bit values are defined by DrawMatchesFlags.
        See details above in drawMatches() .
color – Color of keypoints.

Note For Python API, flags are modified as
    cv2.DRAW_MATCHES_FLAGS_DEFAULT=0,
    cv2.DRAW_MATCHES_FLAGS_DRAW_OVER_OUTIMG=1,
    cv2.DRAW_MATCHES_FLAGS_NOT_DRAW_SINGLE_POINTS=2,
    cv2.DRAW_MATCHES_FLAGS_DRAW_RICH_KEYPOINTS=4
'''
img = cv2.drawKeypoints(image=img, outImage=img, keypoints = keypoints,
                        flags = cv2.DRAW_MATCHES_FLAGS_DRAW_RICH_KEYPOINTS, color = (51, 163, 236))
5. SURF
SURF算法吸收了SIFT算法思想,其检测速度比SIFT快好几倍;不同的是SURF采用快速Hessian算法检测关键点,而SIFT则采用DoG和SIFT检测关键点并提取周围的特征。
应用举例:
cv2.xfeatures2d.SURF_create(8000), #Hessian阈值设为8000;阈值越高,能识别的特征就越少
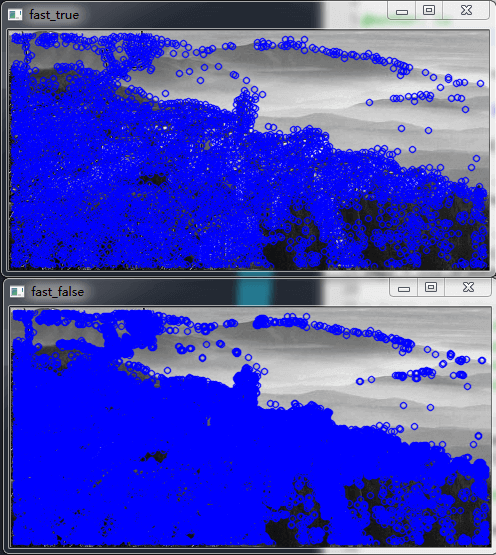
6. FAST
FAST (Features from Accelerated Segment Test) 算法会在像素周围绘制一个圆,该圆包括16个像素;然后,FAST会将每个像素值与加上某个阈值的圆心像素值进行比较,若存在N个连续的像素值比加上一个阈值的圆心的像素值还亮(暗),则可认为圆心是角点。详细介绍查看官网。
(1)应用举例:
# -*- coding: utf-8 -*-
"""
Created on Sun Jul 15 15:33:36 2018

@author: lu
"""

import numpy as np
import cv2
from matplotlib import pyplot as plt

img = cv2.imread("./varese.jpg",0)

# Initiate FAST object with default values
fast = cv2.FastFeatureDetector_create()

# find and draw the keypoints
kp = fast.detect(img,None)
img2 = cv2.drawKeypoints(img,kp,img, color=(255,0,0))

# Print all default params
print ("Threshold: ", fast.getThreshold())   #输出阈值
print ("nonmaxSuppression: ", fast.getNonmaxSuppression()) #是否使用非极大值抑制
print ("neighborhood: ", fast.getType())
print ("Total Keypoints with nonmaxSuppression: ", len(kp)) #特征点个数

# Disable nonmaxSuppression
fast.setNonmaxSuppression(0)
kp = fast.detect(img,None)

print ("Total Keypoints without nonmaxSuppression: ", len(kp))

img3 = cv2.drawKeypoints(img,kp,img, color=(255,0,0))

cv2.imshow('fast_true', img2)
cv2.imshow('fast_false', img3)

while (True):
  if cv2.waitKey(100) & 0xff == ord("q"):
    break
cv2.destroyAllWindows()
(2)运行结果
- BRIEF
从某方面来说,BRIEF(Binary Robust Independent Elementary Features)并不是特征检测算法,它只是一个描述符。关于BRIEF算法介绍,请访问官网。
(1)应用举例
# -*- coding: utf-8 -*-
"""
Created on Sun Jul 15 15:59:57 2018

@author: lu
"""

import numpy as np
import cv2
from matplotlib import pyplot as plt

img = cv2.imread('./varese.jpg',0)

# Initiate STAR detector
star = cv2.xfeatures2d.StarDetector_create()

# Initiate BRIEF extractor
brief = cv2.xfeatures2d.BriefDescriptorExtractor_create()

# find the keypoints with STAR
kp = star.detect(img,None)

# compute the descriptors with BRIEF
kp, des = brief.compute(img, kp)

print (brief.descriptorSize())
print (des.shape)

img = cv2.drawKeypoints(img,kp,img, color=(255,0,0))

cv2.imshow('brief', img)
while (True):
  if cv2.waitKey(100) & 0xff == ord("q"):
    break
cv2.destroyAllWindows()
(2)运行结果

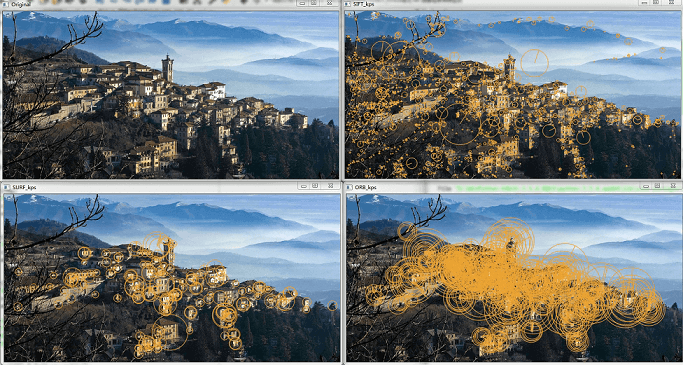
- ORB
ORB的实现基于FAST关键点检测技术和基于BRIEF描述符的技术相结合。
与SIFT和SURF相比,ORB算法有更快的速度,其包括非常重要的一步:以旋转感知(rotation-aware)的方式使用BRIEF,这样即使在训练图像与查询图像之间旋转差别较大情况下,也可能够提高匹配。
注:关于ORB实现特征匹配,将在下一篇介绍。
(1)应用举例
# -*- coding: utf-8 -*-
"""
Created on Sun Jun 24 11:30:20 2018

@author: lu
"""
import cv2
import sys
import numpy as np

img = cv2.imread("./varese.jpg")

def fd(algorithm):
  algorithms = {
    "SIFT": cv2.xfeatures2d.SIFT_create(),
    "SURF": cv2.xfeatures2d.SURF_create(8000),  #Hessian阈值设为8000;阈值越高,能识别的特征就越少
    "ORB": cv2.ORB_create()
  }
  return algorithms[algorithm]

gray = cv2.cvtColor(img, cv2.COLOR_BGR2GRAY)

#1.SITF算法
img1 = np.copy(img)
fd_alg1 = fd("SIFT")
keypoints, descriptor = fd_alg1.detectAndCompute(gray,None)
img1 = cv2.drawKeypoints(image=img1, outImage=img1, keypoints = keypoints, flags = 4, color = (51, 163, 236))

#2.SURF算法
img2 = np.copy(img)
fd_alg2 = fd("SURF")
keypoints, descriptor = fd_alg2.detectAndCompute(gray,None)
img2 = cv2.drawKeypoints(image=img2, outImage=img2, keypoints = keypoints, flags = 4, color = (51, 163, 236))

#3.ORB算法
img3 = np.copy(img)
fd_alg3 = fd("ORB")
keypoints, descriptor = fd_alg3.detectAndCompute(gray,None)
img3 = cv2.drawKeypoints(image=img3, outImage=img3, keypoints = keypoints, flags = 4, color = (51, 163, 236))

cv2.imshow('Original', img)
cv2.imshow('SIFT_kps', img1)
cv2.imshow('SURF_kps', img2)
cv2.imshow('ORB_kps', img3)

while (True):
  if cv2.waitKey(100) & 0xff == ord("q"):
    break
cv2.destroyAllWindows()
(2)运行效果
评论 (0)
暂无评论,快来抢沙发吧!